Injector Kit Instructions
Thanks for buying a set of Flow Force Injectors! There are only a few things that stand between you and the power and performance of EV14 awesomeness. If any of these steps are confusing, or if you run into issues, please email me at team at goflowforce dot com so I can help, and so I can improve this documentation for others.
Note: if you purchased FF640 injectors in early 2019 and your flow rate card says they flow around 110cc, it’s not true. Please email Nigel at the address above for your actual flow rates. #excelfail
If you are the type to wait for the movie to come out rather than reading the book, some customers have created some top-notch videos on youtube. Check out the videos by supercarmio, OGPedXing, and Beavis Motorsport. If you see any other great videos, or if you made one yourself please let me know so I can add it to this list.
Assembly
The following are instructions for a 640cc kit for a 1990-2005 Mazda Miata. Other kits are largely similar.

What's included:
4x EV14 injectors
4x Bottom cushions
4x Blue top hat fuel rail adapters
4x Top hat o-rings
4x Connectors
3x Fuel rail spacers (yes, 3. FF640 only)
1x Dielectric grease
4x Fuel filters (not pictured)
4x Grey bottom cup adapters (FF740, FF900, and FF960 only)
To assemble the injector kit, take the bottom cushion (2) and slide it on to the injector on the end the fuel sprays out. Take a small amount of dielectric grease and apply it to the blue o-ring at the top of the injector, and the included top hat o-rings (4). Slide the top hat o-ring over the top of the top hat and into the machined groove. Drop a fuel filter, basket side first, into the top of the top hat. The bore hole has a taper to it, so the filter will rest somewhere between the very top and half way in. Slide the top hat over the top of the injector. Now, your fancy new injector should have the same basic dimensions as your stock injector. If that isn't the case, something has gone horribly wrong.
Note on the 380cc kit: The filter comes pre-installed in the injector. If you need to remove it, you can do so with a jewelry screwdriver. There are no adapters, although there are spacers. These kits also come with two sets of o-rings. The reason for that is that it’s really easy to pinch them, so I’ve sent some spares. More on that later.
Note on the 740, 900, and 960cc kits: The grey cup adapter goes on the tip of the injector and the blue adapter goes on the top. The bottom cushion goes on the grey adapter. There are no fuel rail spacers.
Note on NC kits - you don’t get buttom cushions or electrical connectors. On the FF640-NC kit, the grey cup takes a green o-ring.
Installation
Follow the instructions in your shop manual to install these injectors. Once they have been assembled, just treat the rest of the process like you would with stock injectors. Be extra careful when you remove your fuel rail. The black plastic isolators are really easy to lose, and you need them for re-assembly. Pop a fuel rail spacer on each one. Also, with all kits, but especially the 380cc kit, if you put the injector in the rail at an angle, or without grease, it’s possible to pinch the o-ring and cause a leak. Be super careful, and use a dab of the dielectric grease on the o-ring to help it slide in place.
When it comes to the connectors, if your car is older and/or higher mileage, there is probably some fretting corrosion in the connector, and you should clean the contacts on the female plugs on your wiring harness. There are various methods to do this, either mechanical (sticking something in there to scrape off any corrosion) or chemical (spray some contact cleaner in there). Either method is fine. Before plugging anything back in, apply a small amount of dielectric grease to both cavities of the female plugs on the included connectors, and on your wiring harness.
Tuning
A programmable or standalone ECU such as Megasquirt, Haltech, AEM EMS etc. is required to run these injectors. It is highly recommended to have someone who really knows what they are doing do this part. If you are that person, read on.
Note that changing required fuel and dead times are not enough to have the car run well. If upgrading from stock Miata injectors or something similar, the entire fuel table has to be re-tuned. This is because EV14 injectors are completely different technology, so it’s not just that 640cc injectors will flow 3x as much at any point, but they will flow relatively different volumes at different duty cycles. Be prepared to fully tune your car.
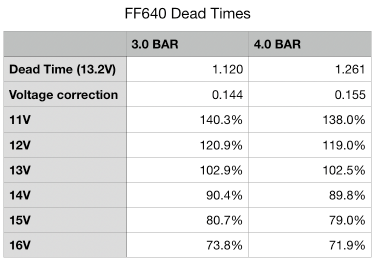
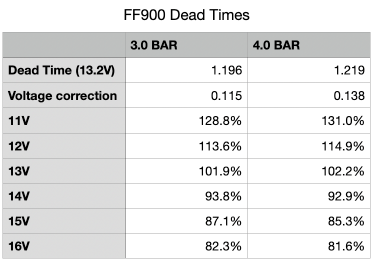
Dead Times
Below are the settings for megasquirt. These settings should also work with other ECUs. Motorsport Electronics will provide a base tune for FF640 injectors with their ME221 (FM221). If you need more or different data for your ECU, email me at nigel at flowforceinjectors dot com.
MS2 users should use just the dead time and voltage correction. MS3 users should use the dead time and the voltage offset %. Unless you have a modified fuel system, 1990-1997 Miatae NA have 3.0 BAR fuel pressure, and 1999-2015 NB/NC have 4.0 BAR.


Flow Rate
The flow rate for each injector is on the included flow rate card, it will be something near the nominal flow rate for the injector size you have. If you have lost your flow rate card, email me your serial numbers (they start with F3, F6, F7 or F9 and are engraved into the injector body) and I'll let you know what the flow rates are.
Flow rates are measured at 3 bar (43.5psi) of fuel pressure. If your vehicle has a different fuel pressure, make sure you adjust for this! For example, a 640cc injector in an NB Miata, which has 60psi of fuel pressure, will flow at 752cc. Use the handy calculator below to convert from the average flow rate listed on your flow rate card to the flow at the fuel pressure you are running.
Happy boosting!